How to Install Fonts on Mac, Windows, iPhone, Canva and Cricut
How to install fonts on Mac, Windows 11 and iPhone, and add them to Canva and Cricut: which file to pick, exact steps, and fixes when a font won’t show up.
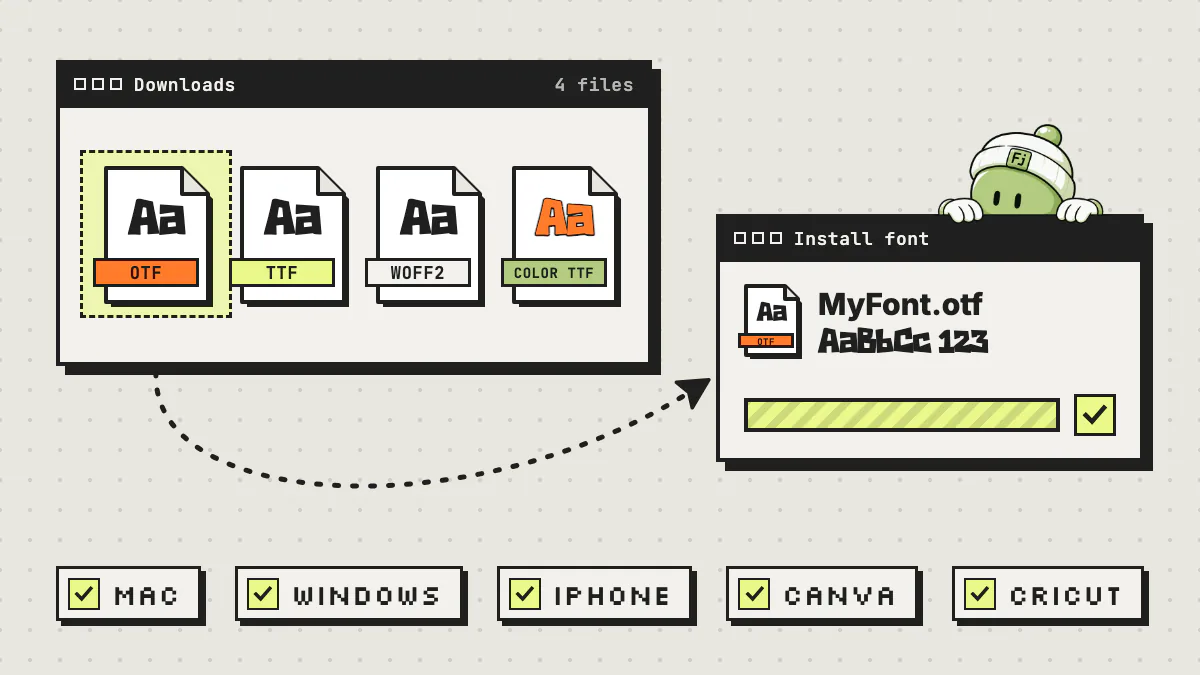
To install fonts on a Mac, double-click the .otf or .ttf file and click Install. On Windows 11, right-click the file and choose Install. Canva works differently: you upload the font to a Brand Kit, which Canva Free doesn’t include. Cricut Design Space uses the fonts already installed on your computer or phone, and iPhones and iPads install fonts through apps.
Below are the full steps for each platform, checked against each company’s documentation in September 2026, plus which file to pick and what to try when a font won’t show up.
Key takeaways
- On a Mac, double-click a .otf or .ttf font file and click Install; on Windows 11, right-click the file and choose Install, or Install for all users.
- OTF and TTF both work on Mac, Windows, Canva, Figma, Cricut Design Space and Procreate, so install one of them (not both, which creates duplicates); WOFF2 is a web font for websites and Canva doesn’t accept it.
- Canva adds your own fonts through Brand Kit uploads, which aren’t part of Canva Free, while Cricut Design Space lists the fonts installed on your device under System.
- iPhone and iPad install fonts through apps, either an App Store font app or an installer app that uses a configuration profile.
- If a newly installed font doesn’t appear in an app, fully quit and reopen that app before trying anything else.
Which font file do I need: OTF, TTF, WOFF2 or color?
For installing on a computer, tablet or design app, use the .otf or .ttf file, since either one works nearly everywhere. WOFF2 is a compressed web font for websites, not something you install. A color font is a font file with color artwork built in, and only some apps display the color.
| Feature | What it’s for | Mac and Windows | Canva upload | Figma, Cricut, Procreate |
|---|---|---|---|---|
| OTF (.otf) | Installing and typing anywhere | Installs | Accepted | Works |
| TTF (.ttf) | Installing and typing anywhere | Installs | Accepted | Works |
| WOFF2 (.woff2) | Websites (loaded with CSS @font-face) | Not an install format | Not accepted | Use the .otf or .ttf instead |
| Color font | Letters that keep their color and texture | Installs like any other font; color shows only in apps that support it | Canva’s help pages don’t cover color fonts | Not covered in their help pages, so test before relying on the color |
OTF or TTF?
When a font comes in both, the two files hold the same letters. They mainly differ in how the outlines are stored inside, and for typing a headline or cutting vinyl you won’t see a difference. What does matter: install one of them, not both. Two copies of the same font is the classic way to end up with duplicates in your font menu (see the troubleshooting section).
Color fonts
Apple lists OpenType-SVG, one of the ways color fonts are built, among the formats macOS supports. Beyond that, support depends on the app, so test before a deadline. Fontjohn’s color .ttf (offered when a font’s sheet has color) shows how this plays out: it keeps its colors in Apple apps, Safari, Chrome on Mac, Adobe apps, Affinity and Firefox, and shows plain outlines everywhere else.
How to install fonts on a Mac with Font Book
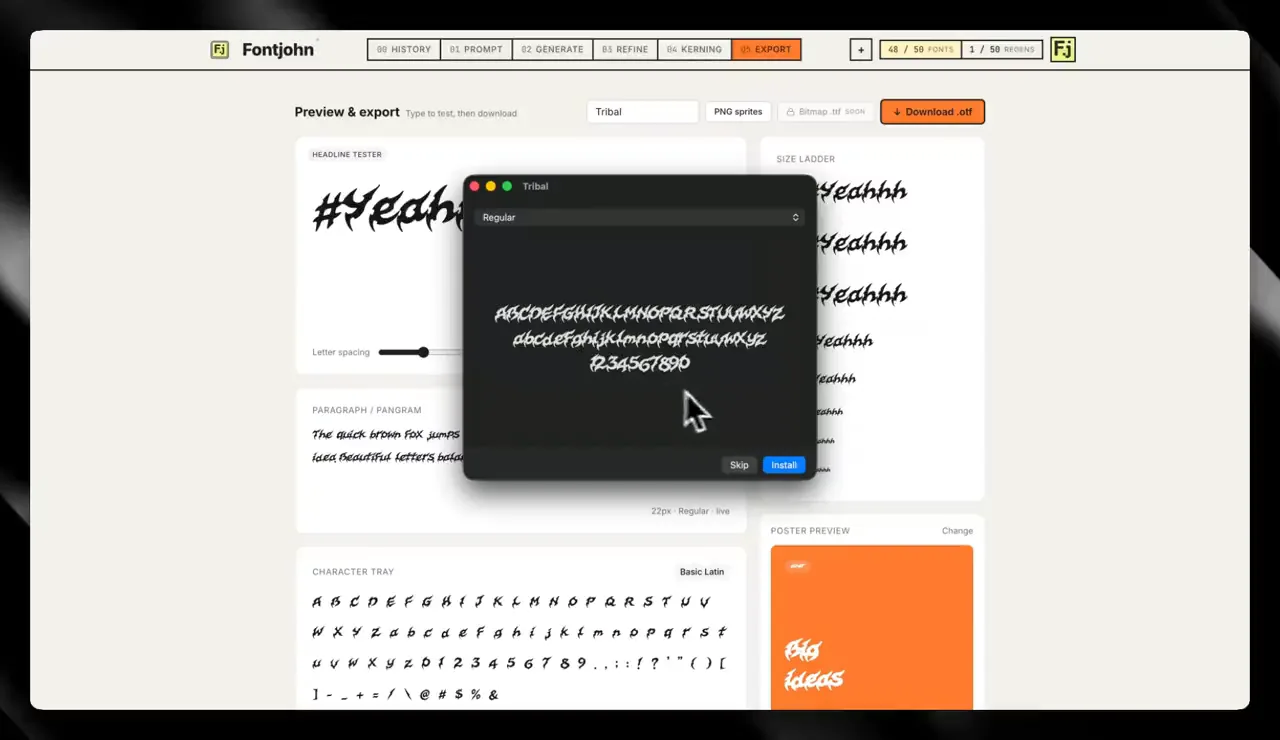
On a Mac, double-click the .otf or .ttf file in Finder and click Install in the preview window that opens. Font Book checks the file for errors and duplicates, then makes the font available to your apps. Whether that’s just your account or every account on the Mac depends on Font Book’s Default install location setting.
Find the font file
Open your Downloads folder in Finder. If the font came as a .zip, double-click it to unzip, then find the file ending in .otf or .ttf.
Double-click it
A preview window opens with the alphabet set in that font. If the file has more than one style, use the menu at the top of the window to switch between them.
Click Install
Font Book checks the font and adds it. If it finds a problem, or the font is already installed, it lists that for you to review.
Pick it in your app
Open (or quit and reopen) the app you’re designing in and choose the font from its font menu by name.
Other ways to install on a Mac
- In Font Book, choose File > Add Fonts to Current User, then double-click the font file.
- Drag the font file into the Font Book window.
- Drag the font file onto the Font Book icon in the Dock, then click Install.
Just you, or everyone on this Mac?
In Font Book > Settings, the Default install location decides. Current User puts fonts in ~/Library/Fonts for your account only. All Users puts them in /Library/Fonts for every account on the Mac and asks for an administrator password.
If the font is already installed, Apple’s Font Book guide says you can keep both versions, skip the install, or replace the existing font. Installing an updated version? Replace it.
About the font in that screenshot: Fontjohn is an AI font generator. Describe a style in a sentence or upload a reference image, and it builds a complete font (A–Z, a–z, 0–9 and 23 punctuation marks) that installs exactly like this. Here’s how to make a font with AI, step by step, and how it compares with asking ChatGPT for a font.
How to install fonts on Windows 11
On Windows 11, right-click the .otf or .ttf file in File Explorer and choose Install. To make the font available to every account on the PC, choose Install for all users instead, which needs administrator rights. You can also drag font files into the Fonts page in Settings, a method Microsoft’s font install guide also describes.
Extract the .zip
If the font downloaded as a .zip file, right-click it and choose Extract.
Right-click the font file
Choose Install for your account, or Install for all users for everyone on the PC. If you don’t see the option you want, look under Show more options.
Answer the prompt
If Windows asks whether you trust the font’s source, choose Yes only if you do.
Reopen your app
Close and reopen the app you want to use, then find the font by name.
Install fonts from Settings
Open Settings > Personalization > Fonts and drop one or more font files into the Drag and drop to install box. That page is where you uninstall fonts, too. And as Microsoft’s font help page points out, not every app supports custom fonts, so if one program can’t see a font, check another.
How to install fonts on iPhone and iPad
On iPhone and iPad, fonts are installed through apps. Apple’s route is an App Store app that comes with its own fonts. For your own .otf or .ttf file, a font installer app packages it into a configuration profile that you install in Settings. Either way, you then pick the font in apps that support installed fonts.
Option 1: a font app from the App Store
This is the route in Apple’s iPhone guide: get an app containing fonts from the App Store, open it to install the fonts, and manage them in Settings > General > Fonts. Apple’s developer documentation adds that apps using Apple’s font install feature (iOS 13 and later) ask your permission first, can only install fonts that ship with the app, and take those fonts with them if you delete the app.
Option 2: your own font file, through a configuration profile
For a font file you already have, you need a font installer app. Some, such as iFont, take your .otf, .ttf or .ttc file and turn it into a configuration profile. The general flow:
Save the font to Files
Save the .otf or .ttf file to the Files app. Unzip it first unless your installer app accepts .zip files.
Open it in the installer app
Follow the app’s own instructions to create and download the font’s profile.
Install the profile in Settings
Open Settings, tap Profile Downloaded, then tap Install and follow the prompts. Apple says a downloaded profile is deleted if you don’t install it within 8 minutes.
Which apps can use installed fonts?
Not every app. Apple’s developer documentation says apps have to opt in to use fonts that other apps install, so a font can sit in Settings and still be missing from one app. Cricut Design Space shows fonts installed on the device under System, and Procreate skips the process entirely by importing font files directly (see below).
How to add fonts to Canva
In Canva, you add your own font by uploading an OTF, TTF or WOFF file to a Brand Kit. As of September 2026, that works on Canva Pro, Teams, Business, Education and Nonprofits, but not Canva Free, and on a team only owners, administrators and brand designers can upload. (Canva Education is free for K–12 teachers and students, and Canva Nonprofits for registered nonprofits, if you qualify.)
Upload a font on desktop
Open Brand
From the homepage side panel, select Brand. If you have more than one Brand Kit, pick one from the dropdown.
Go to Fonts
Select Add to category, then Upload a font.
Add the file
Drag and drop the font file, or select Choose files and open it. Confirm, and wait for the upload to finish.
Use it in a design
Select a text box, click the font name on the toolbar, and scroll to Uploaded fonts.
On the Canva mobile app it’s More > Brand, then Fonts, the add icon, Upload a font and Choose files, per Canva’s Brand Kit fonts article.
Canva upload rules worth knowing
- Formats and limits: OTF, TTF or WOFF, under 15 MB each, up to 500 fonts per Brand Kit. Canva doesn’t accept .zip, .eot, .svg or .woff2 files.
- Bold and italic: upload each style’s file. The B and I buttons stay grayed out if you only uploaded the regular file. Each family can have up to 18 styles.
- No variable fonts: Canva doesn’t support them, so upload separate files for each weight.
- Licensing: fonts should be licensed for embedding, and Adobe Originals fonts aren’t supported, per Canva’s font upload error guide.
- Uploaded but looks wrong: Canva says some fonts upload fine but show missing letters in a downloaded design, and suggests trying a different font.
Building a Brand Kit for a business? Here’s why custom fonts win customers.
How to add fonts to Cricut Design Space
To add a font to Cricut Design Space, install it on the computer, phone or tablet you design on (Mac, Windows or iPhone steps above). Design Space uses the fonts installed on that device, which Cricut calls system fonts. Restart Design Space, add text, then choose System in the font list.
Install the font on this device
Use the steps above. Fonts are per device: a font on your laptop won’t appear in Design Space on your iPad until you install it there too.
Restart Design Space
If Design Space was open while you installed, close it completely and open it again. Cricut’s system fonts guide says Design Space picks up your system fonts each time you sign in, so if the font is still missing, sign out and back in.
Add text and open the font list
Click the Text icon to add text to the canvas, then open the Font menu.
Choose System
The list refreshes to show only fonts installed on this device. Pick yours and start typing.
Two Cricut gotchas
- The Kerned filter hides fonts. Cricut’s text help article says fonts without kerning don’t appear while the Kerned filter is on. Turn it off and search again.
- Some fonts cut badly. Cricut’s own advice is to favor smooth edges and fairly even line weight; grungy letters with lots of little angles and cutouts cut poorly.
Designing fonts for crafters to buy? Our guide on how to make money selling fonts covers the styles crafters look for and where to sell them.
How to add fonts to Figma, Adobe apps and Procreate
Figma and Adobe apps such as Illustrator use fonts installed on your computer, so install the font on Mac or Windows first. Figma in a web browser also needs the Figma font installer. Procreate on iPad is the exception: it imports .otf, .ttf and .ttc files straight into the app, with no system install needed.
Figma
- The desktop app sees fonts installed on your computer. In a browser, first install the Figma font installer, then reload open files (or restart the desktop app).
- To find it, open the Font menu in the right sidebar, open the filter dropdown and choose Installed by you.
- Figma supports .ttf and .otf, but not additional fonts on ChromeOS or Linux. Collaborators need the same font installed, or they’ll get a missing font error, per Figma’s add a font guide.
- The same guide describes another option: upload the font to your Figma account (account menu, then Settings > Account > Your uploaded fonts) and it’s available in any file you view or edit, listed under Uploaded by you.
Adobe apps
Adobe’s Illustrator font FAQ puts it simply: fonts you install on your computer are available in Illustrator. You can also upload your own fonts to the Creative Cloud desktop app to use across Adobe apps. If a font won’t appear, Adobe suggests signing in to Creative Cloud again and restarting your computer.
Procreate
Unzip the font
Procreate imports .ttc, .ttf and .otf files, but not a .zip.
Add text
In your canvas, tap Actions > Add > Add Text.
Import the font
Tap Edit Style > Import Font, browse to the file in the Files app and tap it. It appears in Procreate’s font list.
Dragging from Files in Split View or AirDropping from a Mac works too. Imported fonts live in On My iPad > Procreate > Fonts; delete a file there to remove it, says the Procreate Handbook.
Font not showing up after installing? How to fix it
If a font you installed isn’t showing up, fully quit and reopen the app first (not just its window), because many apps only notice new fonts after a restart. Still missing? Restart the device, then work through the checks below.
Fixes that work everywhere
- Search by family name. Font menus use the name stored inside the file, which can differ from the file name.
- Clear the filters. Cricut’s Kerned filter, a leftover filter in Figma’s font menu and the wrong Brand Kit selected in Canva can all hide a font that’s really there.
- Check the file type. You want .otf or .ttf, not a .zip or a .woff2 web font.
- Try another app. If it shows up in one app but not another, the install worked; the other app may need a restart or may not support custom fonts.
On a Mac
- Dimmed in Font Book? Apple says deactivated fonts are dimmed. Select it and choose Edit > Activate.
- Looks broken or won’t open? Select it and choose File > Validate Selection. Font Book marks each font green (passed), yellow (warning) or red (failed). Check the box next to anything marked red, click Remove Checked, then install a fresh copy.
- Duplicates? Choose File > Resolve Duplicates, then Resolve Automatically or Resolve Manually to choose the copy to keep.
- Last resort: Reset Fonts in Font Book’s settings restores the fonts that came with your Mac and moves the fonts you installed to a separate folder.
On Windows
- Old version still showing? Uninstall it in Settings > Personalization > Fonts, restart the app, then install the new file.
- Another account can’t see it? Install it again with Install for all users.
- Won’t install at all? Extract the .zip first, restart the PC, and on a work computer check whether you need administrator rights, as Microsoft’s install guide suggests.
On iPhone, iPad and Canva
- iPhone and iPad: check that the app’s fonts are listed in Settings > General > Fonts, or that the font’s profile finished installing. Installed but missing in one app? That app probably doesn’t support installed fonts.
- Canva: upload errors usually mean the format, size, permissions or embedding license (see the Canva rules above) or a corrupted file, so download a fresh copy. Uploaded but not in the font menu? Check that you’re on the right Brand Kit.
Frequently asked questions
Should I install the OTF or TTF version of a font?
Either one. Both install on Mac and Windows and work in Canva, Figma, Cricut Design Space and Procreate. Pick one and install only that copy, because installing both versions of the same font creates duplicates in your font menus.
Can you upload fonts to Canva for free?
Not on Canva Free. As of September 2026, Canva’s help center lists font uploads for Canva Pro, Teams, Business, Education and Nonprofits; Education and Nonprofits are free for eligible K–12 teachers and students and registered nonprofits. On teams, only owners, administrators and brand designers can upload, and files must be OTF, TTF or WOFF, under 15 MB, and licensed for embedding.
Why isn’t my font showing up in Cricut Design Space?
Design Space lists the fonts installed on the device you’re using. Install the font on that device, restart Design Space (Cricut says it reads system fonts each time you sign in), then choose System in the font list. If it’s still missing, turn off the Kerned filter, which hides fonts without kerning.
How do I install a font file on my iPhone or iPad?
On iPhone and iPad, fonts are installed through apps. Use a font installer app that packages your .otf or .ttf into a configuration profile, then install that profile from Settings, or get a font app from the App Store that installs its own fonts. Fonts installed by App Store font apps are listed in Settings > General > Fonts. Procreate can import font files directly without a system install.
Do I need to restart my computer after installing a font?
Usually not. Most apps pick up a new font after you quit and reopen them. If the font still doesn’t appear, restarting the computer is a sensible next step, and Adobe lists it among the first fixes for font problems in Illustrator.
Can I install a WOFF2 font on my computer?
Not as an installed desktop font. WOFF2 is a web font format for websites. Apple’s and Microsoft’s install instructions cover TTF and OTF files, and Canva doesn’t accept WOFF2 uploads, so use the .otf or .ttf version for desktop and design apps.
Now make a font worth installing
Describe a style in a sentence or upload a reference image, and Fontjohn builds a complete font. Design and type-test one a month free, then upgrade to download .otf and .ttf files you can install with the steps above.
Design a font freeFree to design and test. Downloads start with Pro.